Formie
User-friendly plugin for Craft, where you can make and edit forms, like you might use for contact lead captures or registrations.
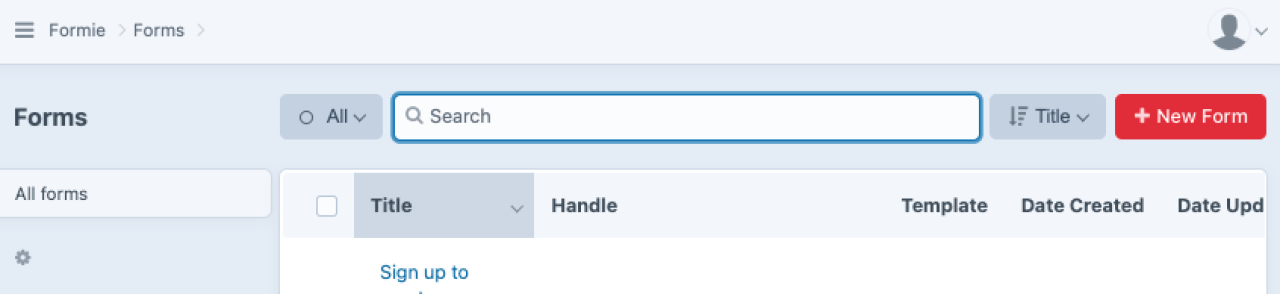
Create a New Form
Start in Formie > Forms. Click + New Form.
Give your form a name as it will appear in the control panel (not the user view).
To spare yourself a bit of work, you may want to choose a stencil if there is one available for the type of form you’re creating, such as a Contact form. If you are creating a more unique form, you can start with Blank Form.
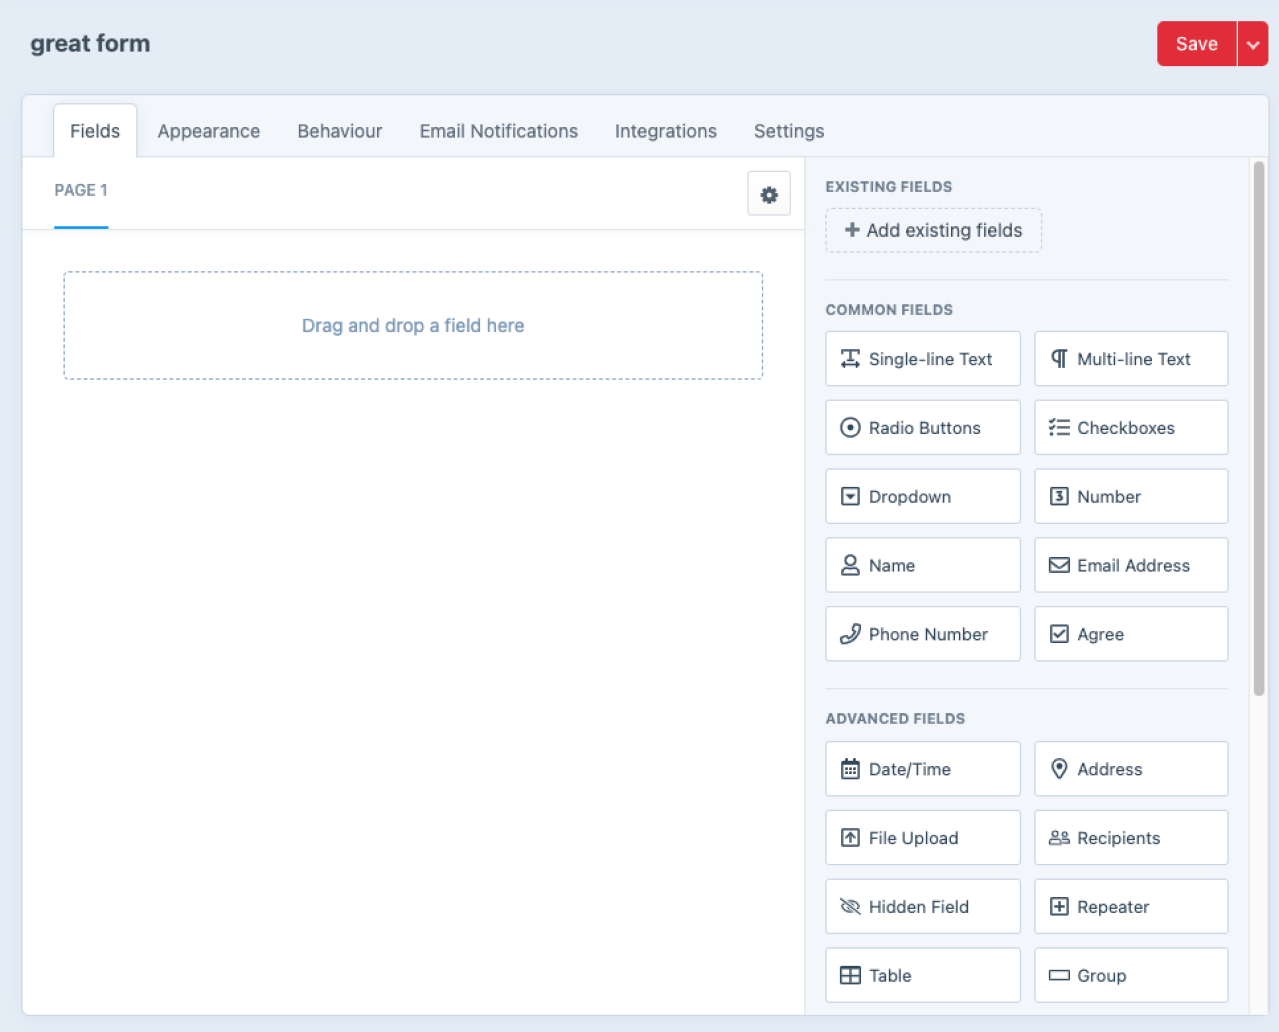
Fields
This section of Formie’s Form Builder is where you enter “fields” to collect specific information from users. You can drag and drop fields from the right side of the screen into the left panel. The order you place the fields is the order they will appear to the user.
If your form is very long, you can break it into multiple pages. Click the gear icon to the right of “Page 1” in Fields.
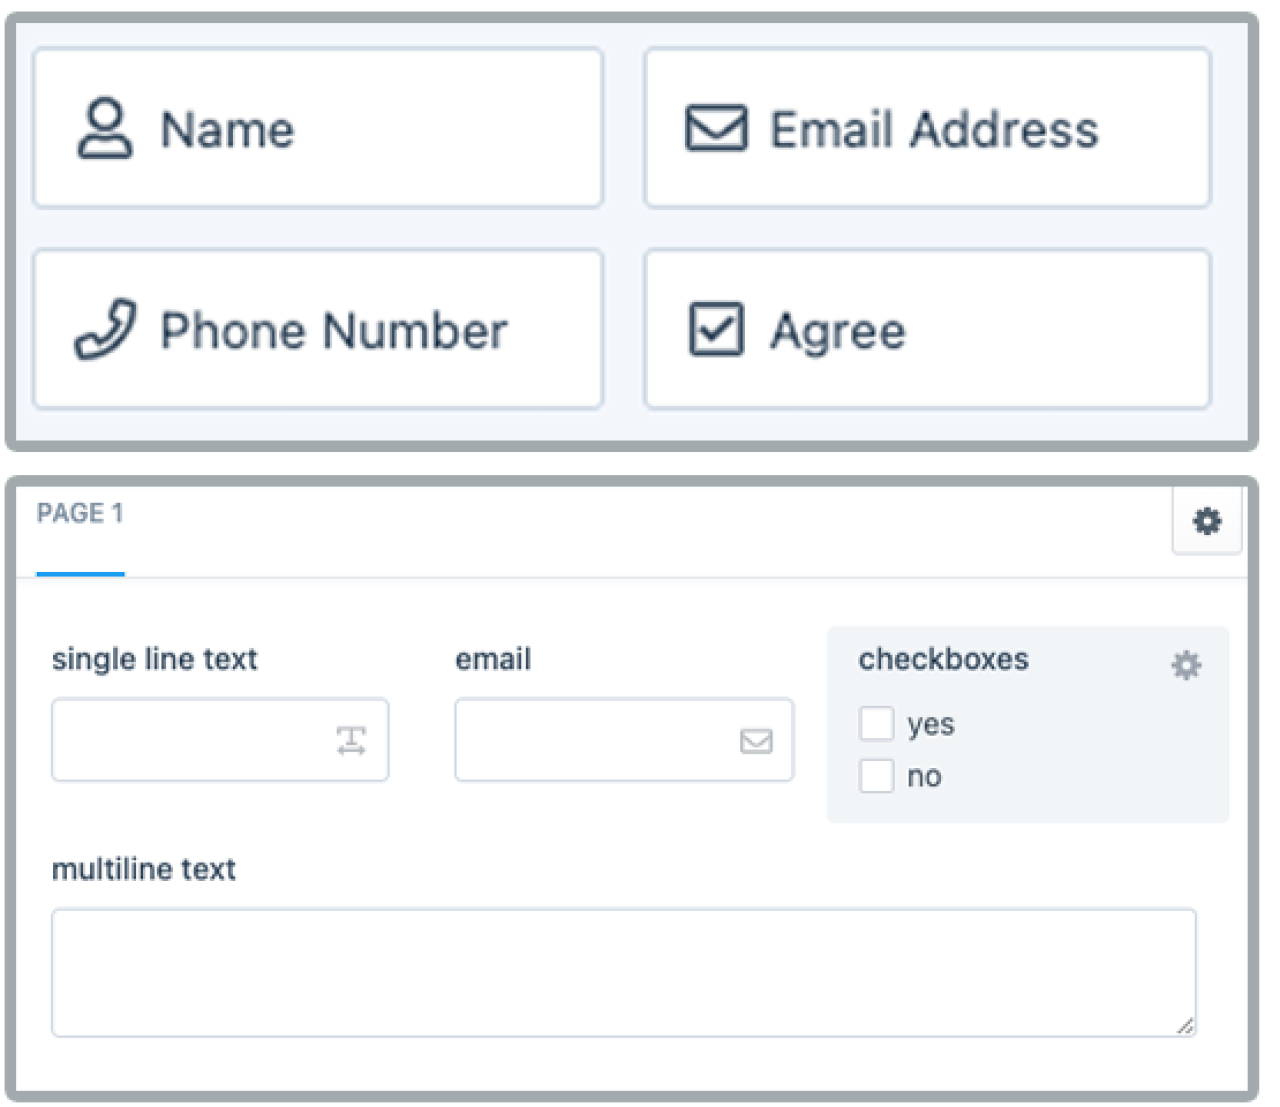
The field types have unique icons, which helps you identify what type of field you have constructed.
You can put multiple fields in a single row or have a field span the entire width.
Some fields seem very similar, but may have special settings and using the different fields has significance when you are later constructing email notifications, which leverage the use of these field names (handles) to pull that variable data into custom email notifications. That is one benefit to using the specific Phone, Email, Name fields rather than just using Single-line Text for all three.
Conditional Logic
You can also add conditional logic to your forms. For instance, you can create a condition so that when the user selects the radio button “yes,” new fields appear, but those fields don’t appear when the user selects “no.” Or perhaps an entirely different set of fields appear when the user selects “no.”
Field Settings
Each field type has settings that often include:
-
Label
What your field is about. This is required.
-
Placeholder Text
An example for the user about the type and format of the information they should enter. Placeholder Text does not get submitted.
-
Required
Select this to force users to complete this field
-
Pre-Populate Value
This is different from the placeholder text because this information will get submitted. This feature is used when forms are programmed to pull data from elsewhere that auto-populates the forms. (Editors should generally ignore this.)
-
Appearance
Allows you to change some of the label visibility and position. Consult WCAG 2.1 to ensure your form remains accessible to all users.
-
Instructions
A space to provide your users with complete instructions for completing this portion of the form.
-
Match Field
When you want to validate the data for that field (numerical, password, email, etc.).
-
Advanced & Conditions
These are powerful, but more advanced features. Visit Formie’s documentation for more details about conditions.
Common Fields:
-
Single-line Text
User can enter one line of text (ex: Department).
-
Multi-line Text
User can enter much longer text (ex: Special Requests).
-
Checkboxes
User can select multiple options (you can limit how many).
-
Dropdown
User can select one option from a list of choices.
-
Radio Buttons
User can select one option.
-
Phone Number
Allows for addition of country code dropdown.
-
Number
Captures numerical input; you can limit possible numbers to a range, and you can allow decimal points.
-
Name
Works similarly to single-line text, except that it has the special option of allowing for multiple name components (first, middle, last, etc.) to be captured at once. As with any of these fields, data captured here can later be used in email notification variables.
-
Email Address
Can include validation and uniqueness rules to ensure that real emails are being entered and that the form is not being duplicated by the user.
-
Agree
Checkbox that the user can select to accept something (entered as text). Set the value when checked/unchecked.
Advanced Fields:
-
Date/Time
Choose date, time, or both. Choose how the user inputs the date/time information. You can also choose to display “Today’s Date” or a specific date by default. You can set date range parameters and specify the appearance of date and time format.
-
File Upload
This allows the user to upload a file. You can specify file types and sizes and the file path.
-
Hidden Field
This can be used when you want to collect data about the user completing the form (like a timestamp, IP address, or referring links), but you don’t want that to be visible to the user.
-
Table
For collecting user-input tabular data. For example, on a conference registration form, a user could choose five sessions from a drop-down list of 20 and then rank their preferences 1-5. Or a user could list favorite movies, rating, and the year they premiered for a survey.
-
HTML
Allows you to embed something like a video, audio, or link.
-
Password
Allows password entry (usually not used for our work).
-
Heading
Formatting (choose a section a heading size)
-
Address
Similar to the Name field in that you can specify components to include in the address collection. You can require some and not others.
-
Calculations
Used to do math or logic using data in the form. Number of Guests x $100 = total cost of invoice. This could be hidden on the front-end, but revealed to users in an email notification, for example.
-
Recipients
Can choose who this form should be submitted via email (eg: if you want your feedback to go WPSU Radio team vs. WPSU TV team.) These emails are protected from bot scraping.
-
Repeater
A formatting piece; put a field element inside of this to allow the user to add more than one (for instance names of people attending when that number varies.)
-
Group
A formatting piece that allows you to group fields. If you’re collecting information about the participant and their emergency contacts, grouping could help clarify whose phone number you want in which field.
-
Section
Formatting that allows you to make a visual linear separation on the form. Select the width, color, and style (solid/dashed) of the line
-
Summary
A field that shows a summary of all submission values to the user. Commonly used on the last page of a multi-page form.
-
Signature
Signature with mouse or finger; choose pen weight and colors for the background and the pen. Saved as an image.
Element Fields:
-
Entries
Users can select from entries that were set up prior to form building within your Craft Control Panel.
-
Tags
Users can select or create tag elements.
-
Users
Users can select users (from users you added to this Craft site)
-
Categories
Users can select from categories that were set up prior to form building within your Craft Control Panel and might include directory elements, for example (faculty, staff, etc.).
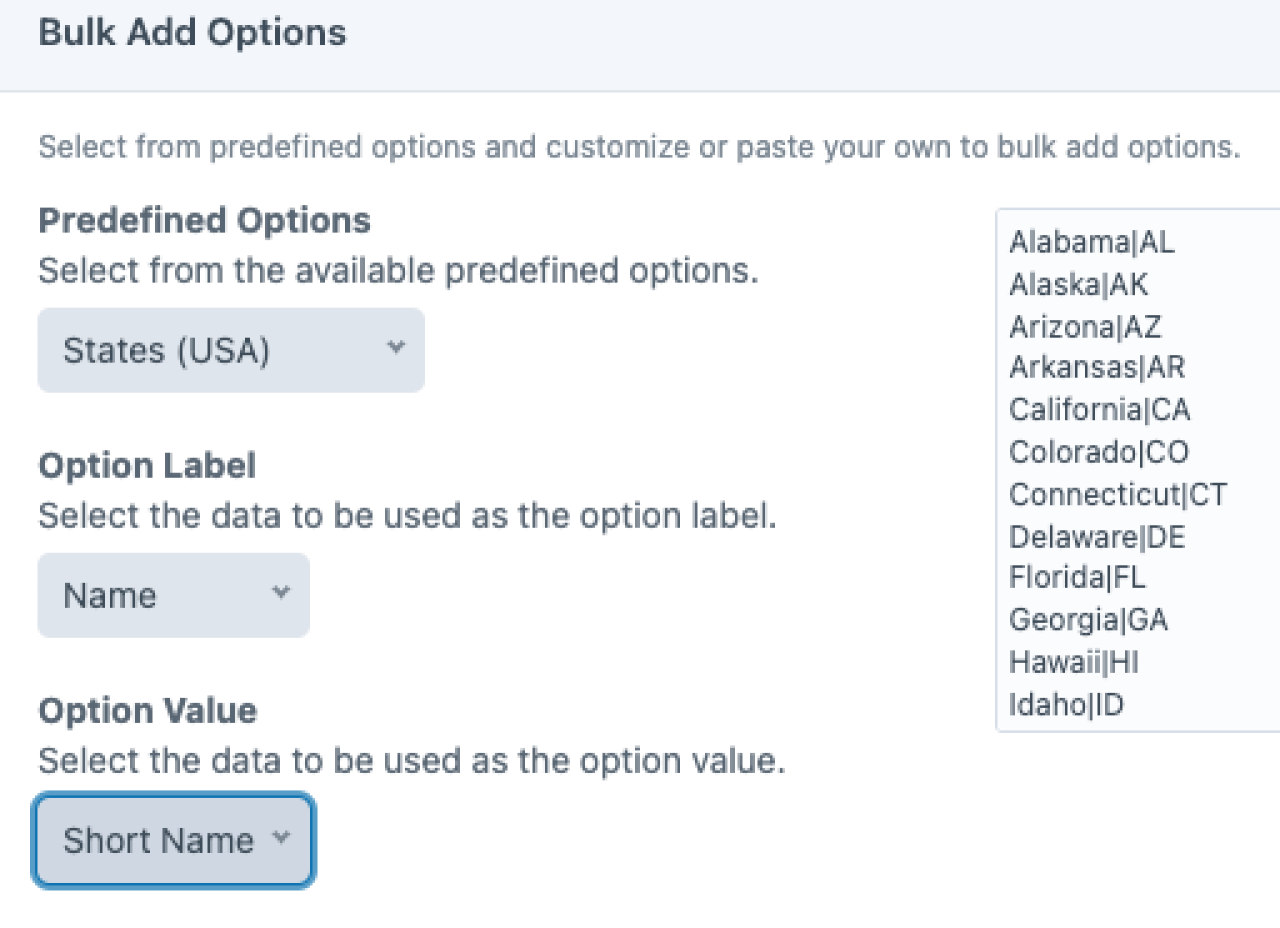
Predefined Field Options
For Dropdown, Checkboxes and Radio Buttons, Formie provides a collection of preset options for common scenarios for you to pick from. This might be useful to quickly populate an entire Dropdown with a list.
Click + Bulk add options to see these presets.
You can also select what content to use for the Label and Value of each option. For instance, you might like to label the option as Australia, but have the value as the abbreviated "AU".
Preset Collections: Countries, States (Canada), States (USA), Continents, Days, Months, Currencies, Languages, Industry, Education, Employment, Marital Status, Age, Gender, Size, Acceptability, Comparison, Difficulty, How Long, Importance, Satisfaction, Would You.
Form Construction in Formie
View of a form in the Formie Admin user interface:
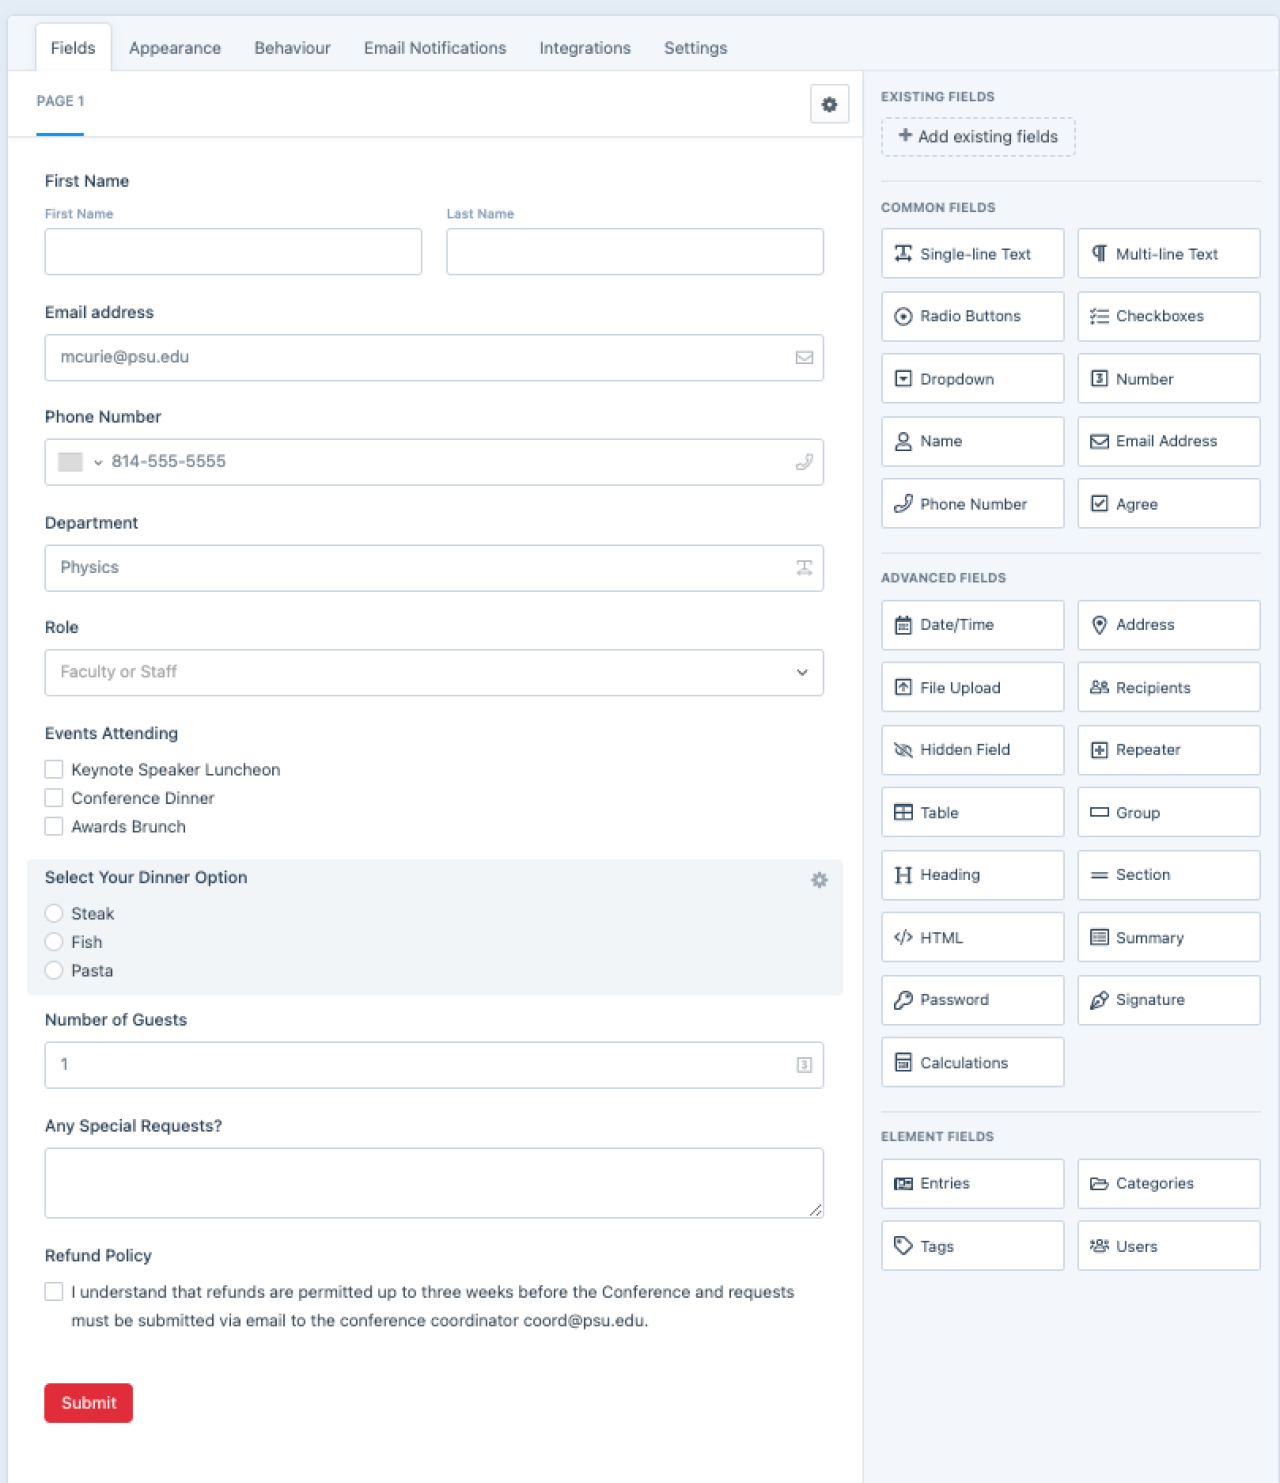
Same form, viewed on the website:

Other Tabs
While the “Fields” tab is where you’ll do most of the form-building, you will also need to visit some of the other tabs in the Formie Form Builder.
Appearance
Set up the overall look of your form, including form title visibility, page progress (when the form is multi-paged), and the positions of labels and instructions throughout the entire form.
Behaviour
Set up what happens when the user submits the form, including: submission method, action on submit (message or redirect to a webpage), validation, and messages and indicators to the user that the form has been submitted or has encountered an error.
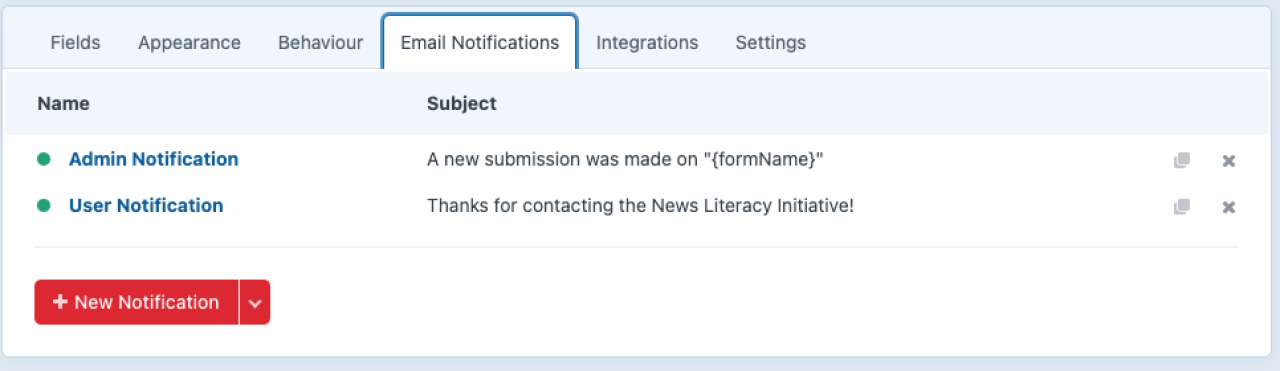
Email Notifications
Email notifications perform two important functions:
- Notify the user their form has been received.
- Notify admins (and/or other key personnel) that a form has been submitted.
You can create as many notifications as you need for each form, so if many people are managing an event, say, you can have the form be sent to a bevy of different email addresses.
You can enable conditions for email notifications. In this way, you could send notifications to different people based on the user’s form input. For instance, you could make notifications for several different departments in your unit, where each only received email notifications when users selected the relevant option(s) on the form.
You choose exactly what content forms the subject and body of the notification, entering your own words and incorporating variable fields from the form.
Email Notification fields:
- Enabled - Whether the notification should be sent.
- Name - An internal name to call this notification in the control panel.
- Recipients - Define who should receive the email notification and set emails or conditions.
- Recipient Emails - A list of email addresses that this notification should go to.
- Recipient Conditions - Conditional logic to determine which email addresses receive the notification.
- Subject - The subject line for the email.
- Email Content - The full body of the email. You can use variable fields to set up the email so that it inserts information like each user’s first name into the message.
- From Name - Always leave blank; it must use the system email.
- From Email - Always leave blank; it must use the system email.
- Reply-To Name - Name of who the reply should be addressed.
- Reply-To Email - The reply-to email address for the email. The email address(es) you want replies to be sent, such as a team or individual involved with the form.
- CC - The cc email address for the email.
- BCC - The bcc email address for the email.
- Attach File Uploads - Whether to attach any user-uploaded files to the email.
- Email Template - To select a custom Email Template – a wrapper developed with organization branding and rigorously browser tested.
- Attach PDF Template - Whether to attach a PDF template to this email notification.
- PDF Template - To select a custom PDF Template, such as might be the case for an invoice, shipping label, or tickets.
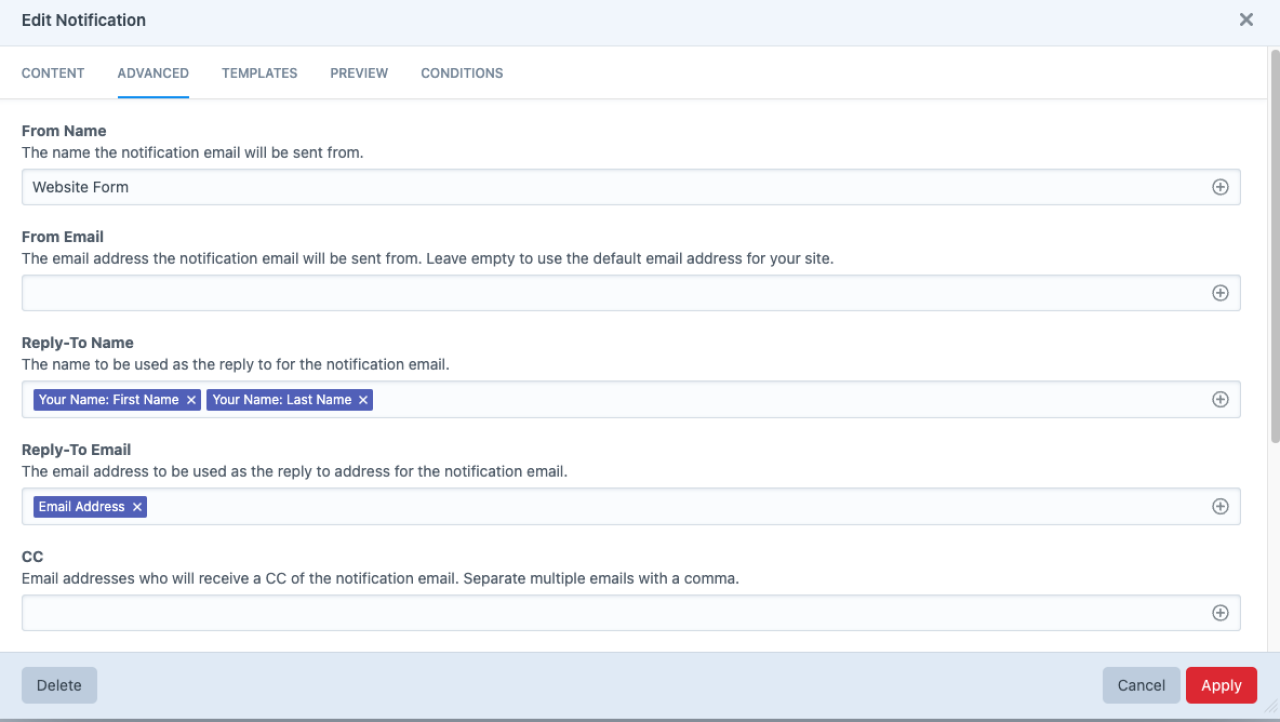
Admin Notification Example:
Both the "From Name" and "From Email" fields are blank; these must be left blank for the notification to work. Notifications will always come from WPSUAWS wpsuaws@wpsu.org, regardless of the site. For this reason, consider using the form's name in the subject line of the Admin notification, so form admins know what they're receiving.
The "Reply-To Name" field includes the sender's first and last name. Likewise, the "Reply-To Email" If the Admin replies to the email, perhaps to answer a question or get a clarification, their reply will be sent to the user.
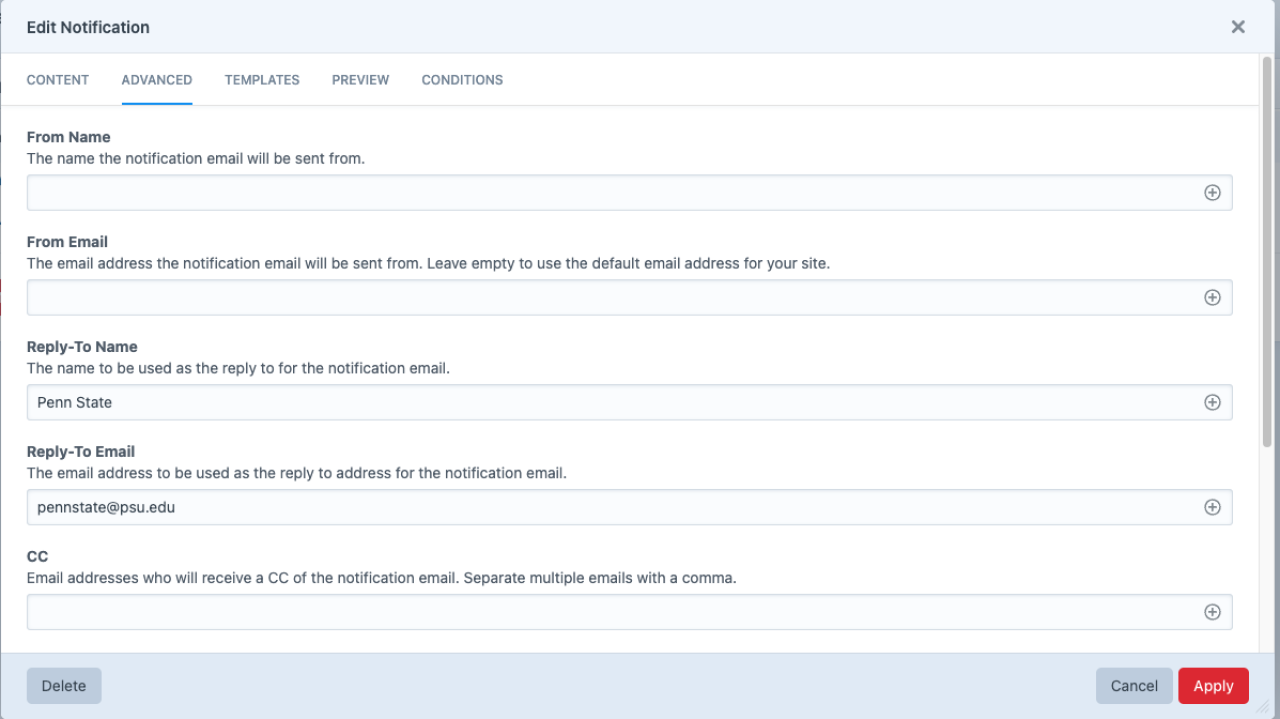
User Notification Example:
Both the "From Name" and "From Email" fields are blank; these must be left blank for the notification to work. Notifications will always come from WPSUAWS wpsuaws@wpsu.org, regardless of the site. 💡For this reason, consider identifying your site early in the subject line of User Notifications.
The "Reply-To Name" can include the typed name of the website organization. It's a good idea to change the "Reply-To Email" to the website organization's main email address, so if a user wants to follow up, they can reply to the email and it will reach the organization.
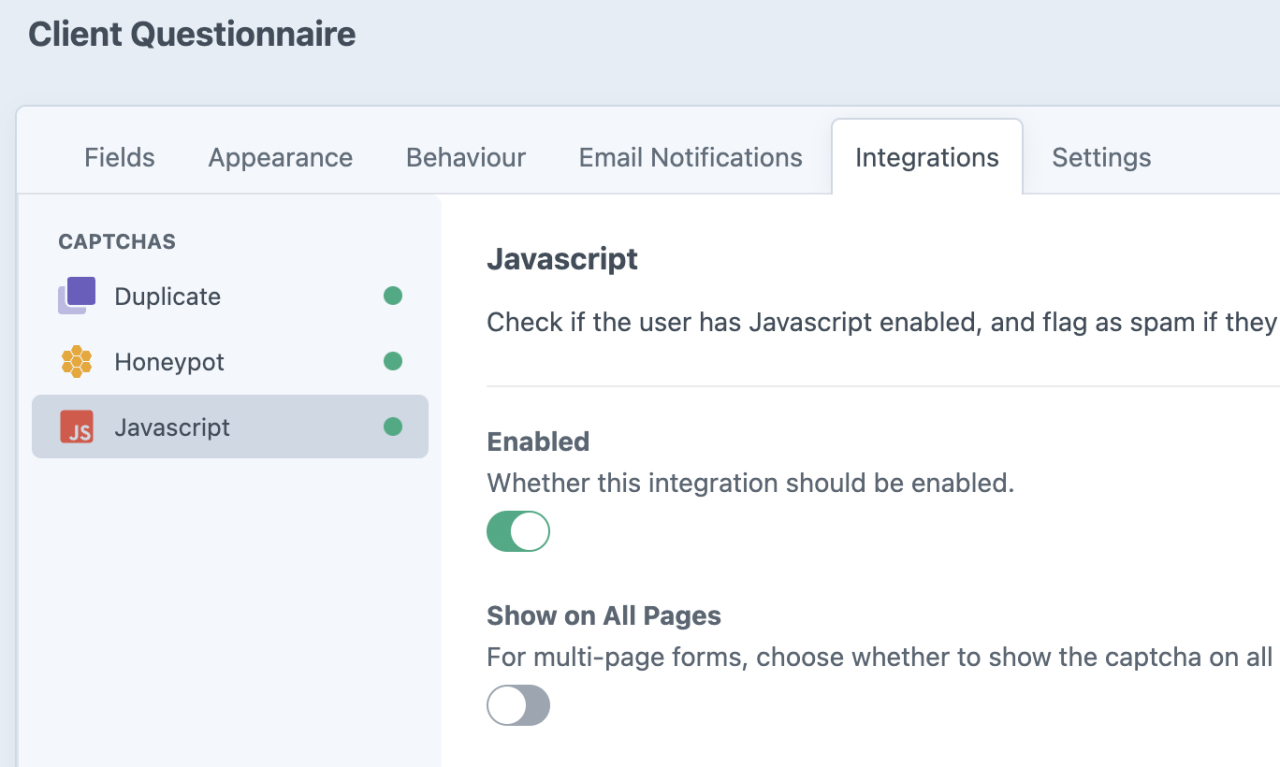
Integrations
Integrations allow the form to work with other technology. Captcha integration is enabled on Formie in Website Builder. Captcha is technology that reduces spamming by distinguishing human from machine input.
Other integrations to explore include those related to Email Marketing, CRM, Payment tools, and more.
Settings
Additional advanced settings, that have to do with programming and data collection and management. You can indicate what data is collected and how long it is retained.
Form Building Final Steps:
- Add to a page in Entries > Content Builder.
- Thoroughly TEST your form and notifications.
Formie Troubleshooting
I submitted a form, but I can't see it in the submissions.
If your users are claiming they have submitted completed forms, but you aren't seeing them as email notifications or on the Formie Submissions page, it might be that they are getting flagged as "spam."
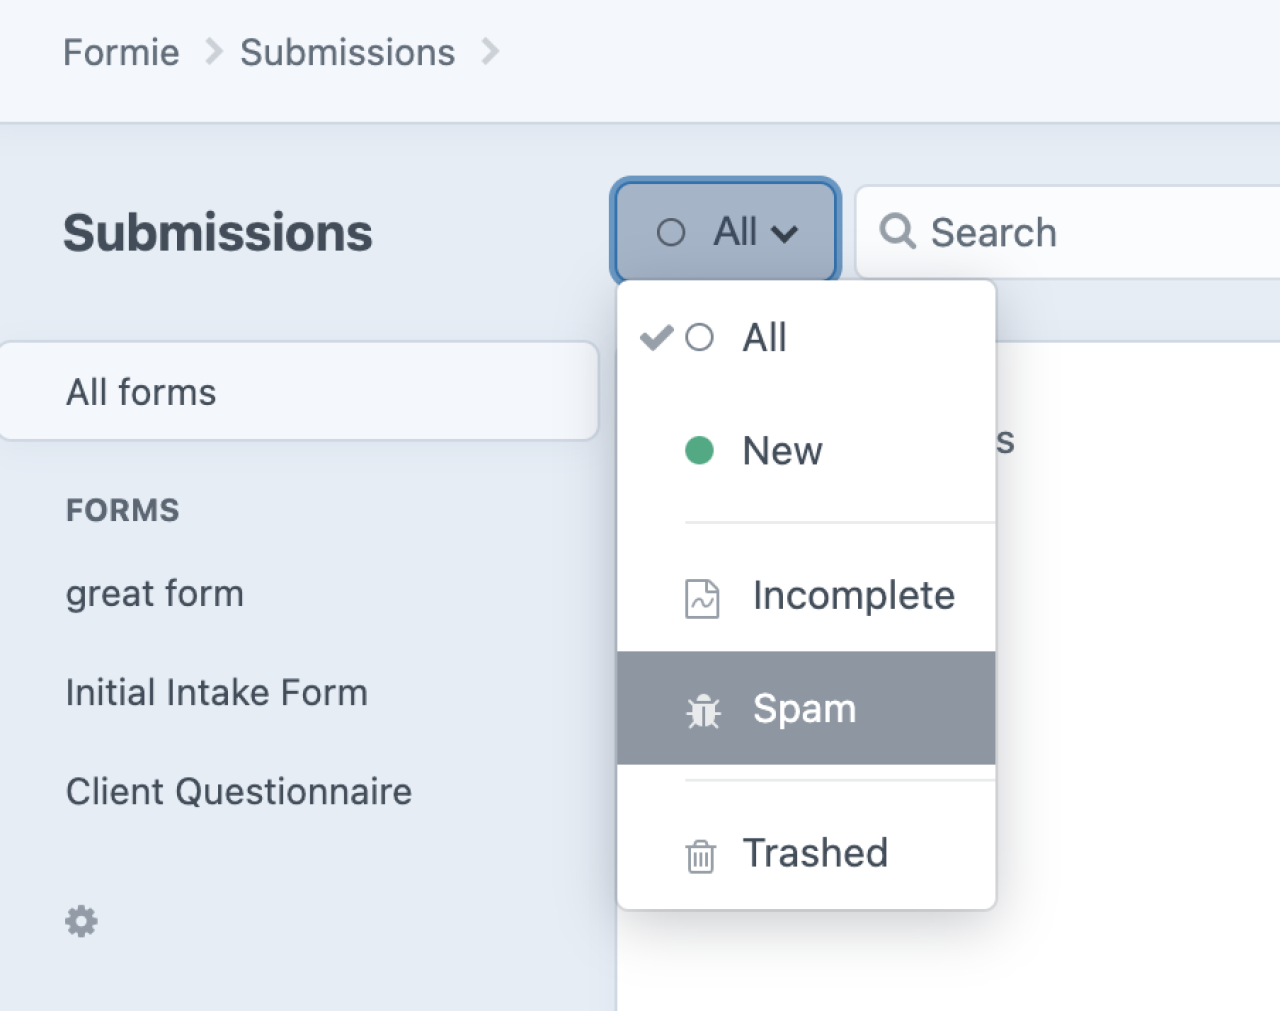
To check if submissions are getting flagged as spam, while you are on the Formie Submissions page for your form, pull down the menu that is next to the Search bar. It probably says "All" with an empty circle. Choose "Spam" from this list to see if there are any submissions flagged as spam.
If legitimate form submissions are getting flagged as spam, this could be for a number of reasons, including the length of time it took the user to complete the form. To reduce the chance of this happening, you can adjust the captcha methods used on your form.
WPSU can analyze which captcha methods are flagging the submissions. If it's one captcha method, such as the Javascript captcha, we can disable that method, while leaving the others on so that submissions you actually want are allowed through, while you retain some protection from getting spammed with the other captcha methods still in place.